The ability to encrypt email is a critical feature. So much information gets sent via email — corporate secrets like specifications, private content like pretty much anything from your accountant or lawyer, or maybe just something you’d like to keep between you and the recipient. Email encryption is a fact of life. Recently, Microsoft moved email encryption into Azure but instead of being called Office 365 email encryption, it’s now Azure Information Protection (AIP).
In doing so, they also simplified the process for users. Reading an encrypted message no longer requires the person receiving it to open an attachment. Instead, they will click on the link in the body of the email. And when a reply is made to the email, the original sender does not have to do anything to open that reply. It is decrypted for viewing automatically. If they send a reply it will again be encrypted automatically. Messages can be encrypted between internal users too. And they’ve even made the third-party authentication easier to use too.
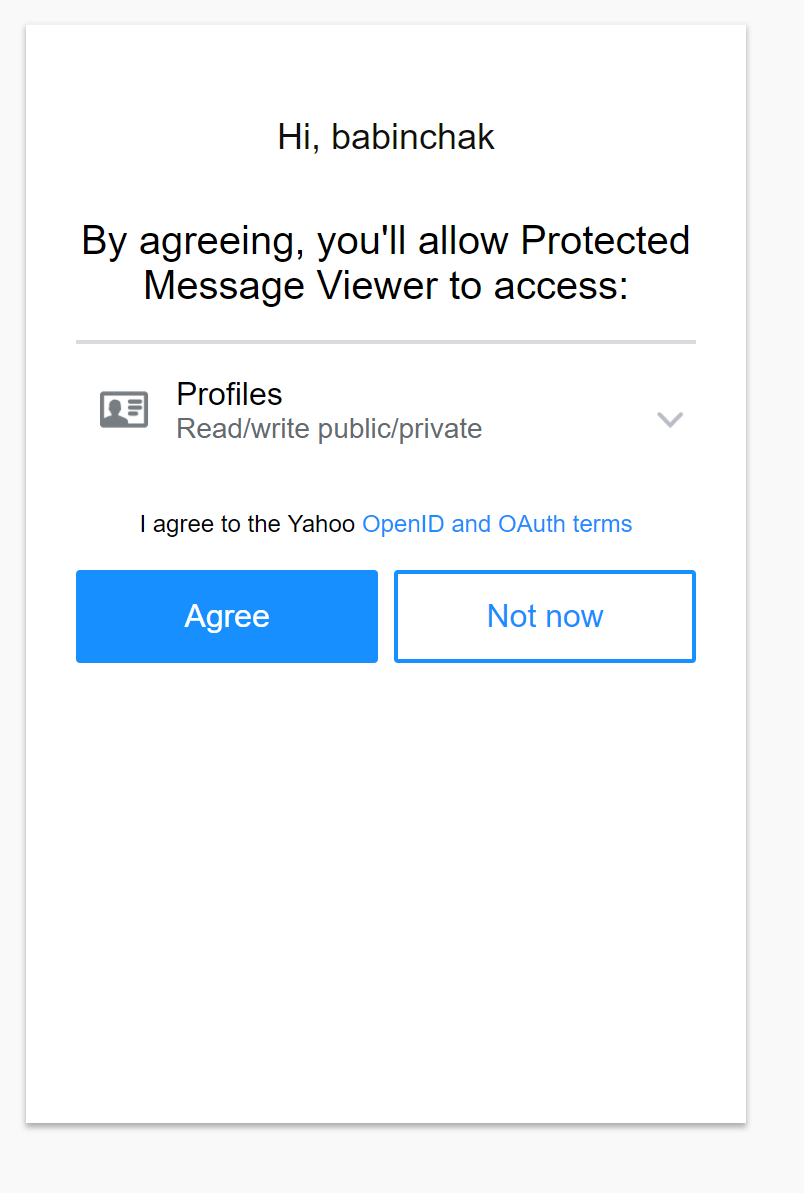
However, while simplifying the email encryption process for users, they’ve added to the workload of administrators because you need to set up your email encryption again to use the new version.
What follows is a step-by-step guide for completely configuring or reconfiguring email encryption in your Office 365 tenant.
For previously configured tenants
I like to start from a clean slate, so for this reason, I’m going to recommend that you remove any encryption rules you previously created from Exchange. After that disable encryption, wait 30 minutes then reenable it. This will make sure that your tenant gets switched over to the new version.
To do that, go to the admin portal/ Settings/Services and add-ons. Click on Azure information protection and disable it. Don’t forget to turn it back on 30 minutes later.
For tenants not previously configured for email encryption
Go to the admin portal/ Settings/Services and add-ons. Click on Azure Information Protection and enable it. It should take effect immediately but you might want to wait 30 minutes just to be sure.
For tenants created after February 2018
Azure Information Protection should be enabled by default so you won’t need to turn it on. You can move straight into configuration.
Check that AIP is working
Before we try to configure anything, let’s take a moment to make sure that it’s working correctly. You’ll need PowerShell for all of the configurations from here on out. First you need to connect to your Exchange Online Service. Be sure to run PowerShell as an administrator then run the following commands.
Set-ExecutionPolicy RemoteSigned [when it asks for a no, yes or all, select all]
$UserCredential = Get-Credential [you’ll get a pop-up authentication window. Enter your global admin credentials]
$Session = New-PSSession -ConfigurationName Microsoft.Exchange -ConnectionUri https://outlook.office365.com/powershell-liveid/ -Credential $UserCredential -Authentication Basic -AllowRedirection
Import-PSSession $Session
You should now be connected to the tenant. Now run the test. Make sure you use an active mailbox for the test, not just the admin account. Oftentimes the admin account does not have a mailbox anyway.
Test-IRMConfiguration -Sender admin@yourdomain.com
Results : Acquiring RMS Templates …
– PASS: RMS Templates acquired. Templates available: youdomain – Confidential View Only, yourdomain – Confidential, Do Not
Forward.
Verifying encryption …
– PASS: Encryption verified successfully.
Verifying decryption …
– PASS: Decryption verified successfully.
Verifying IRM is enabled …
– PASS: IRM verified successfully.
OVERALL RESULT: PASS
We’re ready to configure
Now that we know that AIP is working, we are ready to configure it. There are several pieces to this. There’s creating the rule for when encryption gets applied to an email, allowing attachments to be unencrypted by the recipient, customizing the email, and optionally setting up a super-admin to decrypt messages and files encrypted by your staff. Leave your PowerShell session open until you’ve completed the entire process.
Create an Exchange rule
You need a mail rule to tell Exchange when you expect messages to be encrypted. The rule I suggest uses a keyword to trigger the encryption. In the example that follows, when the word securemail is present anywhere in the email, Exchange will encrypt the message.
Open the Exchange online administrator console.
Go to Mailflow/Rules.
Click the arrow next to the + sign and choose Add new Rule type Apply Office 365 Message Encryption and rights protection to messages.
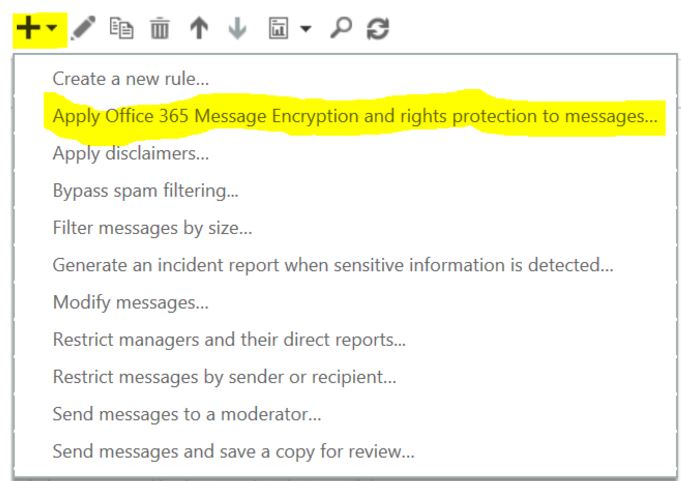
Name the rule Encrypt on Demand or anything that you’ll remember.
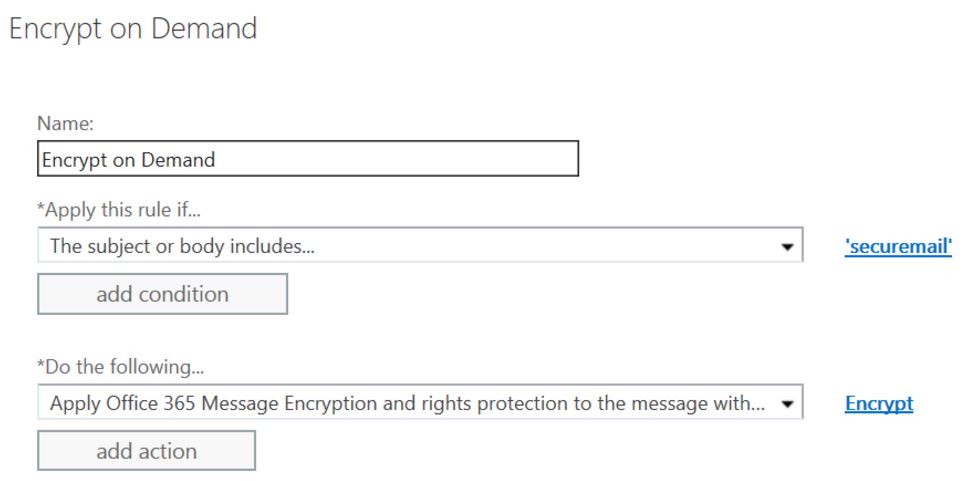
In the Apply this rule if…box select The subject or body includes the word securemail (or any other word of your choosing but it will need to be a word that someone won’t type by accident).
In the Do the following…box select Apply Office 365 Message Encryption and rights protection to the message with and select the Encrypt template
Admin control for attachments
By default, attachments to your encrypted email are also encrypted and can’t be opened outside of your company. They say that there is an option to change this but I don’t think that your users will feel that way. It is very common that the reason for sending an encrypted message is because of the content of the attachment. Microsoft’s reasoning for not making this the default setting is that once decrypted the message is plainly available to the recipient to do with as they choose.
To allow the downloading of attachments without protection for Encrypt-only:
Set-IRMConfiguration -DecryptAttachmentFromPortal $true
Customize the appearance of the encrypted email
By default, the email message gives the recipient that phishy feeling, so you will want to customize the content to indicate that they email is legitimate. In addition, I recommend that anyone using encryption get in the habit of first sending a regular email letting them know that an encrypted email is about to follow.
Here I am simply sharing Microsoft’s instructions for these customizations. I’ve added a couple of tips to their chart and provided a sample.
| To customize this feature of the encryption experience | Use these commands |
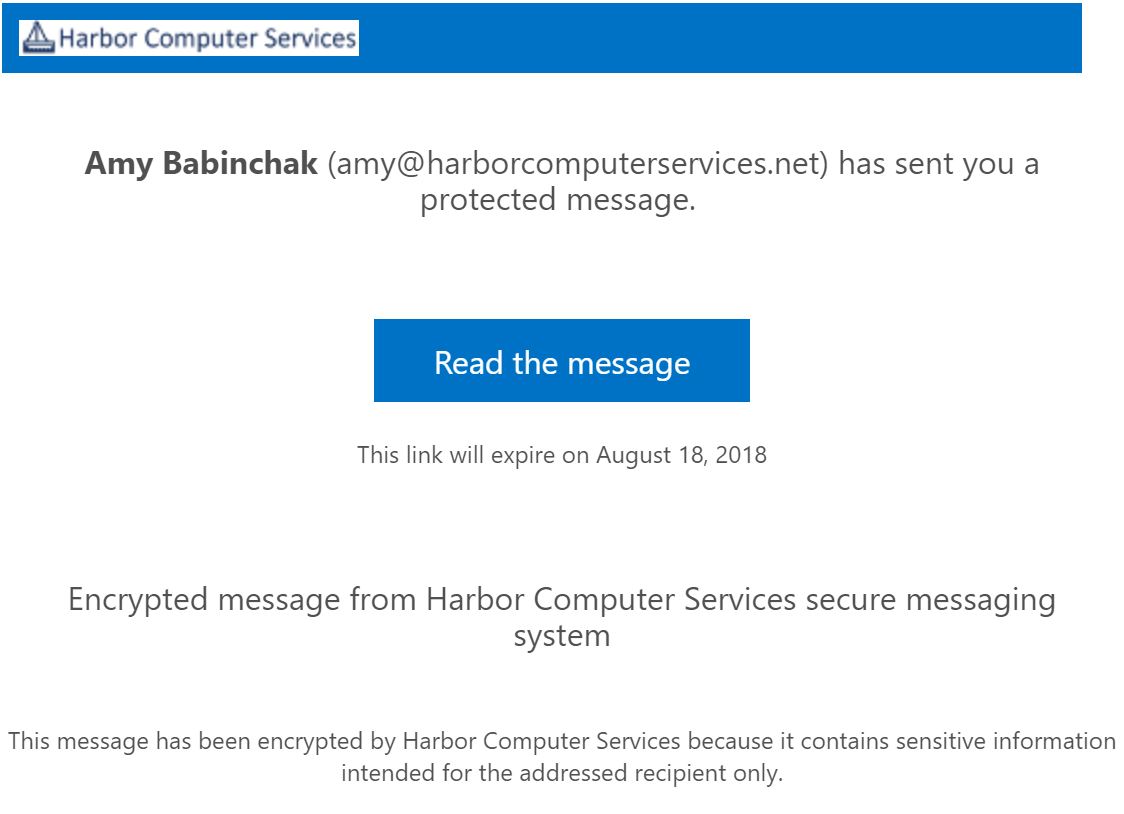
| Default text that accompanies encrypted email messages. The default text appears above the instructions for viewing encrypted messages | Set-OMEConfiguration –Identity <OMEConfigurationIdParameter> -EmailText “<String up to 1024 characters>”Example:Set-OMEConfiguration -Identity “OME Configuration” -EmailText “Encrypted message from Your Company secure messaging system.” |
| Disclaimer statement in the email that contains the encrypted message. | Set-OMEConfiguration –Identity <OMEConfigurationIdParameter> -DisclaimerText “<Disclaimer statement. String of up to 1024 characters.>”Example:Set-OMEConfiguration -Identity “OME Configuration” -DisclaimerText “This message has been encrypted by Your Company because it contain sensitive information intended for the addressed recipient only.” |
| Text that appears at the top of the encrypted mail viewing portal | Set-OMEConfiguration –Identity <OMEConfigurationIdParameter> –PortalText “<Text for your portal. String of up to 128 characters.>”Example:Set-OMEConfiguration -Identity “OME Configuration” -PortalText “Your Company secure email portal.” |
| Logo: We will likely have to make one up. I like to use GIMP. Any editor can be used. This is very small so often the real corporate logo cannot be used but instead just the name of the company would be appropriate. | Set-OMEConfiguration –Identity <OMEConfigurationIdParameter> –Image <Byte[]>Example:Set-OMEConfiguration -Identity “OME configuration” -Image (Get-Content “C:\Temp\logo.png” –Encoding byte) Supported file formats: .png, .jpg, .bmp, or .tiffOptimal size of logo file: less than 40 KBOptimal size of logo image: 170×70 pixels |
| Background color: this setting is not needed unless the company really objects to blue. Blue is the default color. | Set-OMEConfiguration –Identity <OMEConfigurationIdParameter> –BackgroundColor “<Hexadecimal color code>”Example:Set-OMEConfiguration -Identity “OME Configuration” -BackgroundColor “#ffffff” |
When you get all done it should look something like this. In the sample below you can see where each of the text items is located in the message.
Setting up the super-admin
A super-admin is necessary to decrypt messages that anyone may have encrypted. Do note that it is also possible to encrypt files as well as email. Files in SharePoint and OneDrive can be stored encrypted at rest, and this super-admin will have decrypt control over those too.
This super-admin is a very powerful tool. You do not have to set them up before you need it. You can add the super-admin when needed and remove it when not needed. It would be more secure to do so. However, in a company where turnover is a regular occurrence, you might find that you need it more often than you don’t.
To set up your super-admin, run the following commands. Items in brackets are my comments and are not part of the command.
connect-aadrmservice [connects you to Azure AD. When you run this command you will be prompted to authenticate again. This is because you are changing services. Previously we were connected to Exchange Online, now we’re connecting to Azure AD]
enable-aadrmsuperuserfeature [enables the feature]
Get-AadrmSuperUser [shows you if there are any users already set up as a super admin]
get-aadrmsuperusergroup [shows you if there are any groups already set up as a super admin]
If there are any users already set up, verify that they should be there if not remove them using the remove-aadresuperuser -email <address> command or aadresuperusergroup if it’s a group you want to remove.
add-aadrmsuperuser -emailadress <email address> [adds a user as a super admin]
Finally, test email encryption with a real user
Now for the all-important testing phase. There’s plenty of room for error in everything that we’ve done above so don’t let this go without testing. Please find a friendly user in your company to test with.
- Send an email with securemail in the subject line to your account. And reply. Make sure the email can be opened.
- Send an email to a public email address such as Gmail or Yahoo. And reply. Make sure the email can be opened.
- Send an email with an attachment and make sure that both internal and external users are able to open it.
Office 365 NEW email Encryption configuration. It took a lot longer to write this and much longer to read it then it takes to implement. In my MSP practice, we are completing these tasks in under an hour including the customization piece that is the longest part of the whole configuration due to the logo customizations that it requires. But this time is an hour well spent. Email encryption will protect the information that needs protecting and make email a much better resource for communicating sensitive information.
Originally posted in 2018 this popular post was migrated over from our previous blog
Make your IT business better than the competition. Help for IT Pros, TechYourBooks, Super Secret News, Women in IT Scholarship program, Ransomware Prevention Kit, 365 Security kit and more. https://www.thirdtier.net



2 thoughts on “Office 365 NEW email Encryption configuration”
Nice write up. My tenant is configured, seemingly correct, and working. However, I have noticed that some users report not being able to view emails there were encrypted in their sent folder. Any idea on what could cause that?
It could be that they are logged into the computer with a local or domain account. Sometimes this can cause token confusion.