
First an attribution to Joseph Moran and George Dusenberry for developing the method and automated script. Thank you for being great citizens and approving the sharing of this important solution.
UPDATE: Since publication we have learned that there is a hard limit on the total size of all transport rules taken together. If you have run into this error. Write-ErrorMessage : |System.InvalidOperationException|The transport rule can’t be created because you’ve exceeded the number of characters available for word- or pattern-matching in all your transport rules. Your transport rules are using 20944 characters, and the maximum number is 20480. Reduce the number of characters, either by removing content, such as words or regular expressions, from the conditions or exceptions, or by removing conditions or exceptions. Or delete existing transport rules that use word- or pattern-matching. Consult this article: https://learn.microsoft.com/en-us/exchange/troubleshoot/email-delivery/transport-rule-not-created-because-too-large
Recently a new trend has emerged where criminals are attempting to hide their activity behind a barrage of spam email to the compromised mailbox or to any popular mailbox in the domain. The point of this is either, “Hey, IT look over here! and not over here!” or an attempt to make it difficult for you notice the email conversation in the mailbox that they are having with your bank or a customer as they scam someone out of their hard-earned money. In either case, we have to make the spam stop so business can get back to normal. Just keep in mind that the spam isn’t the problem you have, it’s there to cover up the problem.
Download the script set: https://www.thirdtier.net/shop/
Third Tier is currently running a course on Microsoft Defender and the students share SOPs. One that came up wasn’t a configuration SOP but rather a cure for the mass spam problem.
Block mass spam using an Exchange transport rules
You will need to block and maybe eventually unsubscribe the targeted user from hundreds or thousands of newsletters and marketing funnels. These are legitimate newsletters and websites and so we can use the Can Spam rules of email deliver to help us reduce the spam barrage.
We will use a script containing the email addresses of the newsletters and websites to create several transport rules that will drop the email. This will trigger an unsubscribe from the delivering email service for legitimate newsletters and websites. However, there will be a lot of addresses to block so a single rule would exceed to 8K limit for a transport rule size.
Using PowerShell, we will use a list of addresses contained in a CSV file to automatically create multiple transport rules of the appropriate size.
Create your CSV file
Although the script package you are going to download from me contains a CSV file of 700 addresses, you will still want to generate your own that will contain the exact address list of emails that are filling the problem mailbox.
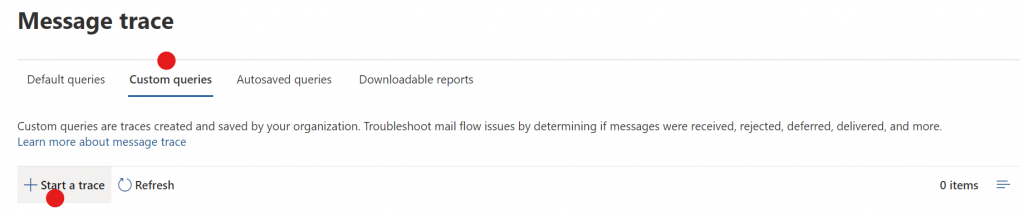
- Open the Exchange Admin Center message trace. Message trace – Exchange admin center
- Select Custom Query and Click + Start a trace
Fill in the fields with the red ball below with your selections.
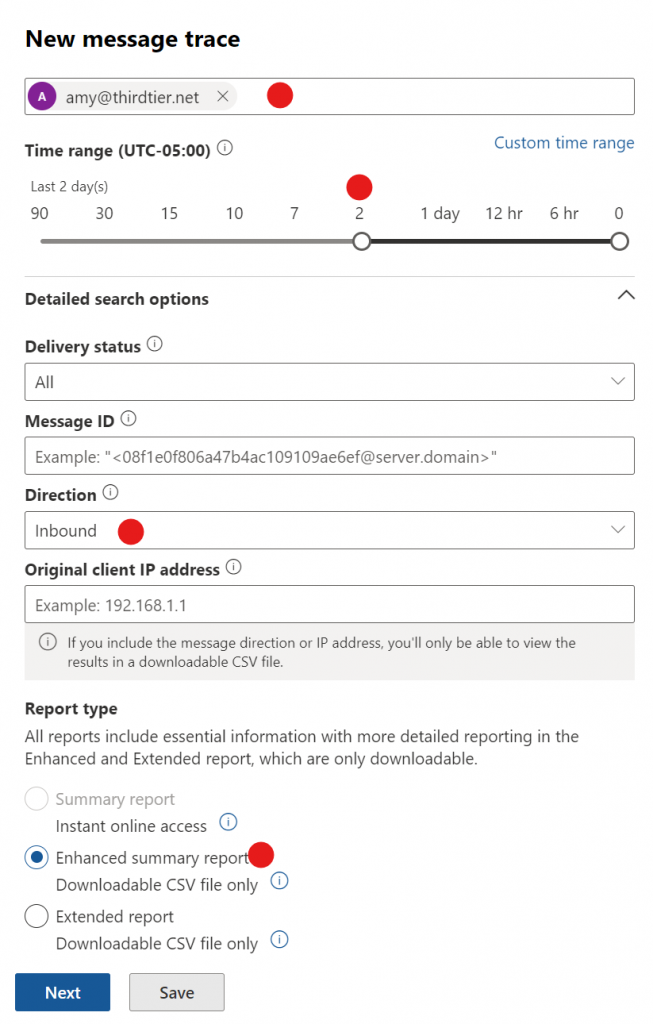
Click Next and then Run Report. After a while, probably 60 minutes, a CSV file will be generated that you can download. An email will be sent to the administrator, and it will also be available in the Downloadable Reports section of this same screen that we were working in.
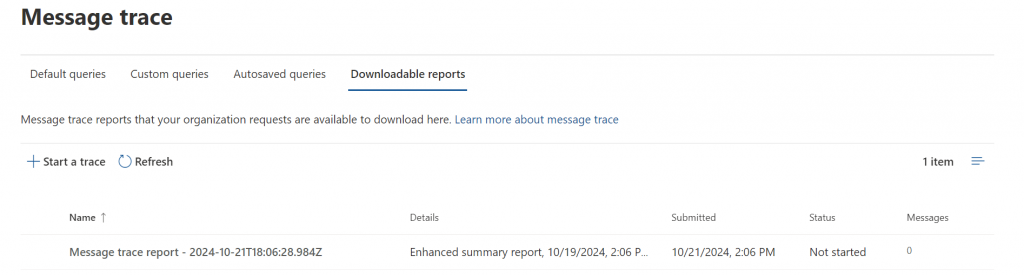
It’s not easy to be patient in a time of crisis but you’ll have to be. Generating these reports is low priority for Microsoft. It’s in the cue of work that Exchange needs to do. Hit the refresh button get this screen to update. When it is finished, download the CSV file.
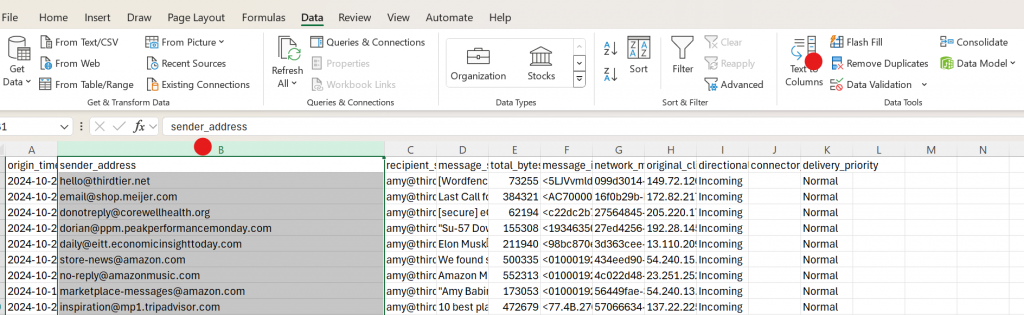
Use Excel to clean the CSV file
Open the CSV file in Excel and use Excel find duplicates feature. The result will be a clean list of unique addresses.
Highlight the sender_address column. Move to the Data tab, then select the Remove Duplicates data tool.
Now you have a choice.
- Copy and paste these addresses into the CSV file provided in the package you are downloading from me. In which case you will be adding your custom list to the list provided. This may or may not be of any benefit.
- Or edit this file so that it only contains the SenderAddress column. Make sure that the format matches the provided CSV. Most notably that it only has one column and the title of that column has been edited.
Log into Exchange Online
To log into Exchange Online using PowerShell, follow these steps:
- Open PowerShell as an administrator.
- Install the Exchange Online PowerShell module if you haven’t already:
powershellInstall-Module -Name ExchangeOnlineManagement -Force
- Import the Exchange Online PowerShell module:
powershellImport-Module ExchangeOnlineManagement
- Connect to Exchange Online using the following command. Be sure that put in your own email address:
powershellConnect-ExchangeOnline -UserPrincipalName your_email@domain.comNow, edit the powershell script that you downloaded.

As instructed in line 16 put in the path to your CSV file and in line 24 customize the name of the transport rules that will be created.
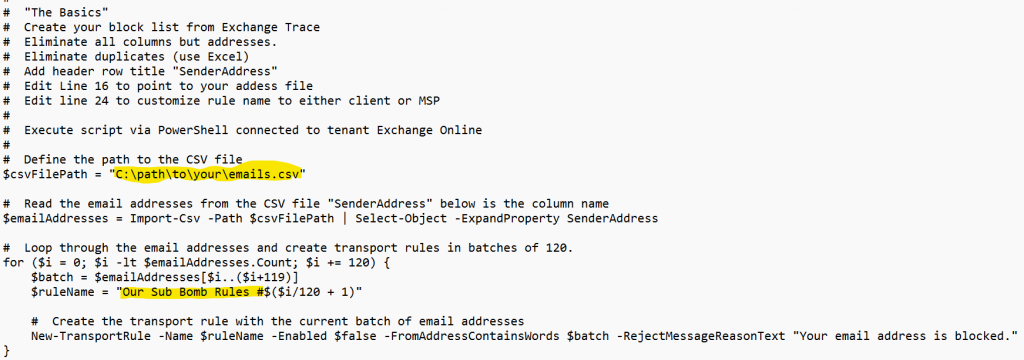
Run the script. The script will create the number of transport rules necessary to block all of the addresses in your CSV file. Each rule will have 120 addresses in it, which will keep it below the 8k rule size limit.
The last step is to enable the rules.
Over the next few days, you will need to make a new CSV file with additional addresses to be blocked but soon the mail flow will be back to normal. Now, you have to find out what the criminals did to the business, because sending a lot of email to it was not the goal. It was just the distraction.
Help the IT community by sharing this blog post far and wide and while you’re here maybe sign up for our M365 Admins newsletter, join a Mastermind Group or participate in our Intune, Defender and Security communities on Facebook.
All we do is support IT professionals. Help for IT Pros, M365 admin News, Security community, Mentor-led Mastermind groups, MSP training and more. https://www.thirdtier.net


